knitted cupcakes

image38


Knitted cupcakes makes me happy. Real ones does to, but the knitted ones last longer.

If you want to knit some yourself check this blog.

camera troubles

Oh dear me, my camera is dying on me! How unlucky can I be? How can I live without it? And how will I afford a new one? That explains the super bad quality of my pictures lately, sorry. Can I live with this? I hate technical failiures.

knitted chains

For this project you will need a set of cicular pair, they look like this (I use size 4,5):
image33

Cast on 60 sticthes. Join the last and the first stitch into a circle, continue knitting until you have 20 rows before you cast off. Then you have the first link of your chain.
image35

Repeat what you just did but before you join the circle thread the needles through the first circle. Then you just have to repeat the same thing with all circles, linking them through eachother before you join each circle.
image36

When knitting the last circle thread through both end circles so it makes a continous chain.
image37


It's in knit stitches nature to roll up towards its top and bottom rows, this time it's actually a good thing, hiding the edges. You don't really need to do anything with the loose ends, you can just tuck them into the rolled up edge, but if you want it to be neater you can off course finish them off pulling them through some of the knitted stitches with a needle.

I find this necklace/scarf so goodlooking! You can wear it just hanging or wrapped twice around your neck if it's cold outside, could be useful since the summer is a bummer.

If you don't have the time to make it yourself you can buy mine.

pimp my match box

My friend Eva gets crafty points on this pimped match box. There wedding was wonderful and I think it's a great idea to spread your memories on an every day item like this, super cute!
image31
If you understand Swedish you can find this and other crafty bits on her blog.

how to knit

I will be showing some knit projects in the future, so I thought I have to show you how to do it from scratch. Luckily there are plenty of knitters out there that already did. These youtube clips from yarnsnob are easy to follow. And if you don't get it the first time you can just watch over again.

You start with a slipknot.

Then you need to cast on.

The knit stitch is the easiest one to start with.
Since I'm SwedishI knit continental style, I guess it's just a matter of what you're used to. The purl stitch is also needed very often. If you have knitted a row of knit stitches you usually knit purl on the other side.

To finish it off you need to bind off.

There you go, now you know how to knit!

belgian vintage

I`ve said it before, Belgium has the best fleamarkets. I`m in Gent at the Gentse Feesten and the fleamarket close to our house is on during the whole festival. There is always a guy who sells clothes for 5 euro each. Today I bought two dresses.

I`m finally back to how I looked before being pregnant, I just stopped breastfeeding, I guess it has something to do with the change. I`m celebrating getting my body back with some serious shopping.image27
Look at this beauty! The fabric is exquisite and the making is perfect. And look at the print: image26


And here is the other one:
image29image28image30
It also has a very pretty print. I`m thinking alot about prints at the moment, they all include stripes, or stripy patterns. They`re all in my head at the moment, hopefully they will be on a fabric soon.

There is another fleamarket in Gent tomorrow. I hope I will find some long lost treasures, I know I will.

my chains

This is my friend Katarina showing off the chains I knitted. The colour suits her so good.
image24
A tutorial on how to make your own will be up shortly.

knitted oversized chains

image22image23
I saw these chains on Susie Bubble's fashionable blog a while ago and I wanted them badly! So I started to think about how to make my own. When I realized how to do them it wasn't that hard really.

going back

Most of all I miss my man, but he doesn't belong in this crafty blog, but my room does.
image17image16image18

This is what I left behind i Gent, Belgium, and on wednesday I'm going back. I really miss my creative atelier. To be able to close the door, not being forced to care about making a mess. Everyone of you using fabrics knows how messy it can be. Any crafts needs their own space to mess up. Oh, and I miss the wallpaper, my favourite.

image19

The best thing with being in Gent is that I will have TIME to make things, since I'm not alone taking care of my son there. I love my son and spending time with him, but I would also love to have some more time of my own, making. I get one or two hours after he's gone to bed and by then I'm usually knackered. So hopefully you will see more activity of new things being made the next couple of weeks. Hurray!

interact the page

When I do pages I often include things where the viewer has to interact to be able to see the whole page. It gets more interesting that way. Remembering the joy of books from my childhood that had flaps to open and straps to pull, that revealed a secret or something funny.

This page includes a flap that you can open to see more photos. It saves space, if you want to include many photos on the same page.
image11
The writing on the sides are stickers behind a transparent paper. Gott nytt is Swedish meaning Happy new and gelukkuige is dutch meaning happy. The photos are from family dinner this New Years Eve.

image12

The purple paper with sparkly spots is an old wrapping paper. I don't spend much money on scrap supplies. I don't really see the challenge in putting together a page with things you bought in a kit ment to go together. I usually don't even like the looks of them. I always use cheap stuff I found somewhere ment for something else. I guess everyone scrap in a different way, this is my take. The most important thing is that you enjoy doing it, which I really do.

michy moo

A new european etsy darling is found!
image8image9image10
Do visit her store for more fabulous things, and why not read her blog
Kategori:

stitching

This is a piece of leather with stitched writing.
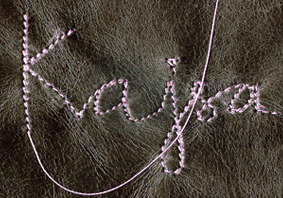
image7
How to make this:

Write or draw your design on a normal piece of paper and stick it on the leather with tape, make sure it doesn't move. (You can also use a sturdy fabric, if you want to do it on stretchy material, back it with a heavier backing.) Then run over your design through both paper and material with a sewing machine, that's the trickier part, it takes a bit of practice, use a cheaper fabric to start with. If you come to a sharp turn, put your needle down in the material, raise the foot, turn, lower the foot and keep on going. You might have to adjust the tape during sewing. When you`re done with sewing, just rip the paper off and your design is on the material.

I love the look of stitches, you can make lots of beautiful different creations using this technique.